Basics to get started
1. Setup
For Mac, brew install git.
For Linux, sudo apt-get install git (you can try sudo apt-get install git-core if Git is not installed) or yum install git.
For Windows, download the bash client here and install it, and you get bash commands for free, happy days!
Even though I tend to avoid GUIs cause they are confusing, inefficient and most importantly not hipster, you can still find something from GitHub or Tower.
2. Create a repository
Easy peasy.
$ git initCopy a remote repository
You can copy either from a server or most likely GitHub, you can have a quick scan through this to decide which remote URL to use.
$ git clone <repository>I personally use SSH because I used to work behind a corporate proxy.
Stage changes
Before commit, you need to group your changes and add them into stage.
To add files one by one.
$ git add <file>Or don’t care, just add them all.
$ git add .Some really cool stuff you should try with stage.
$ git add -pStash changes
Not ready to commit, or before re-synchronising your code with remote and don’t want to lose your local changes? Stash them.
It does what it says, to keep your things away from destruction.
$ git stashYou can always find the things you stashed here.
$ git stash listAnd applying last change set back to codebase.
$ git stash popOr applying a specified change set.
$ git stash pop <stash>Unless you want to both apply a change set and keep the stash in the stack.
$ git stash apply <stash>Commit changes
Happy with the changes? Commit them and give them a meaningful message. And I seriously mean it!
$ git commit -m "<message>"Commit logs
Like showing commit history in any version control system, Git is just more powerful in every single way.
To see the commits from a specific user.
$ git log --author=<user>To show the files changed.
$ git log --name-statusTo view a compact one liner commit history.
$ git log --pretty=onelineEven more crazy things you can do, like displaying an ASCII art tree commits decorated with tags and branches.
$ git log --graph --oneline --decorate --allPush changes
So far it is all great, but only in your machine. If you want to be colleborative, push your commits to the central repository so that your colleagues can criticise them.
$ git pushIn case you haven’t setup a remote repository for your current branch yet, hook it up with one.
$ git remote add origin <remote>Then do the push again.
Branch
It’s important to get codebase organised using dedicated branches for stuff like new feature, bugfix or release candidate. This has been proven to be a very successful branching model for the majority.
Branching in Git is fast. Faster than subversion.
$ git branch <branch>To list all the branches.
$ git branch -vaTo switch to a branch and start working.
$ git checkout <branch>This is a short hand for creating a branch, switching to it, and bring all unstaged changes with you.
$ git checkout -b <branch>Want to share your branch?
$ git push -u origin <branch>-u is to establish a tracking relationship between a branch and its remote branch
Update
It is a good idea to get a cup of tea in the morning, and update your code!
$ git pullMerge and Rebase
And because you haven’t done what I suggested above often enough, you are more than likely to end up with conflicts after a short while.
Keep calm and use merge, and Git will automatically integrate the changes for you.
$ git merge <branch>And this is still faster than subversion, yet another win for Git.
Alternatively, use rebase to fast-forward your branch.
$ git checkout <master>
$ git rebase <branch>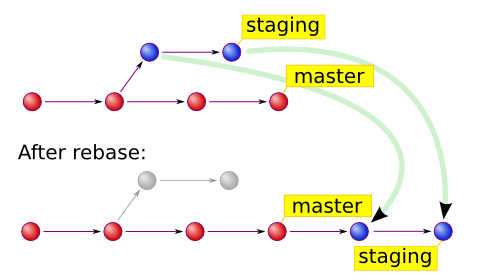
Git rebase works like a transplant
Be aware that rebase will replace current branch’s commit history with the other. And that is why a timely update is so important to avoid situation like this.
A little case study just to see if you are still awake: how to synchronise a fork with the source of truth.
First add the source repository as an upstream.
$ git remote add upstream <remote>Then fetch all its content.
$ git fetch upstreamSwitch to master branch, and rebase the master with upstream.
$ git remote add upstream <remote>
$ git rebase upstream/master
If you just want the changes, but don’t necessarily need the change history, merge is another option. I would not recommend this as it could cause more pain later.
$ git merge upstream/masterPush the new codebase to your fork.
$ git push origin master -fTagging
Tag a specific commit for release.
$ git tag <tag> <commit>The power of undoing
Use with caution.
Undo changes
Before changes are staged, you can revert a single file.
$ git checkout <file>Or revert all of them.
$ git reset --hard HEADUndo stage
What happens if you put the wrong file into stage, or don’t want it to be part of the commit?
$ git reset <file>Undo commits
Revert a commit by creating a new commit to rollback last commit.
$ git revert <commit>Rollback to a specific commit, and reserve changes.
$ git reset --keep <commit>Abandon ship.
$ git reset --hard <commit>Reset is similar to revert under the hood, the removed info is still kept in git database for 30 days. So you can always unearth them if you want.
Rewrite last commit message
Wrote something inappropriate? Rewrite it. Limited to last commit only.
$ git commit --amendDelete a branch
Remove a branch locally.
$ git branch -d <branch>And remotely.
$ git branch -dr origin/<branch>It’s all about Flexibility
Git is highly configurable in itself.
$ git config --listAnd indeed whatever is listed here and more, you can adjust it based on your own preferences.
If you have an extremely small terminal, typically less than 72 characters wide, your display will be truncated like following (left) before 2.1.0.
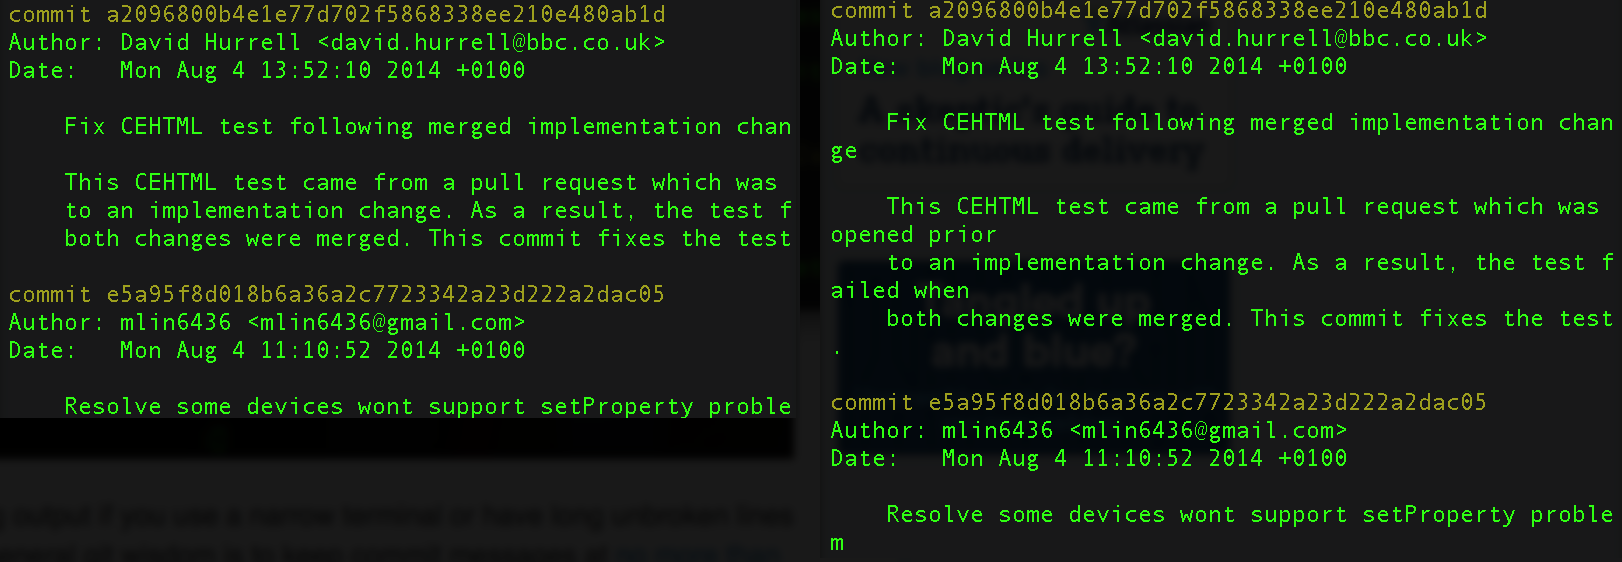
Git log displayed with truncati (left) and normal (right)
You don’t have to wait for the 2.1.0 to able to display a wrapped log like the example to the right. Even though git log uses less -S by default, it doesn’t mean you can’t make it more user friendly (as to the right):
$ git config core.pager "less"Some things to bear in mind
Git is a powerful tool, but it doesn’t prevent you from shooting your own foot if you don’t work under some basic principles. In order to make everyone’s life easier, it is useful to have some common sense when working with Git.
Commit only related changes
Write good commit messages
Use branches extensively
Never commit half-done work
Never amend published commits